

If you get a lot of email, you know how hard it can be to spot messages from friends and family, or from your most important contacts. The recently introduced VIPs feature,added to Mail 6 in OS X Mountain Lion and iOS 6, can alert you when you get emails from your most important friends and colleagues, whether you’re using your computer, iOS device, or even iCloud mail on the Web. Here's how to use it.
Set up VIPs
The VIPs feature works on Macs running Mountain Lion, on iOS devices running iOS 6, and on iCloud on the Web. You can have up to 100 people listed as VIPs.
As long as you’re signed into your iCloud account, your VIPs will propagate across your devices, even to iCloud email on the Web. In addition, if your VIP has a card in Contacts and has more than one email address, the VIP status will be applied to all their addresses. However, there is no way to create or remove VIPs from within Contacts, either on OS X or on iOS.
Adding VIPs on your computer When you get an email from someone in Mail, open the message and hover your cursor over his or her address; a star will appear. Click this star, and the contact will be added to your VIPs list. You can also hover over an email address, click the down-pointing arrow that displays, and choose Add to VIPs.
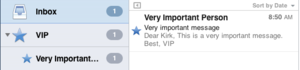
If this is your first VIP, a VIPs mailbox will appear in the Mail sidebar. Click the disclosure triangle next to that mailbox to see all your VIPs listed. Click on a name to see all the emails you’ve received from that person.
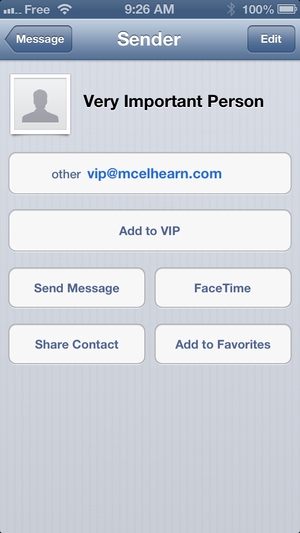
Adding VIPs on an iOS device If you want to add someone to your VIP list on your iOS device, tap the person’s name in the header of an email message to view his or her contact information. Then tap the Add to VIPbutton to add the person to the list. When you return to Mail, you’ll see all your VIPs’ messages in the VIP mailbox. (The VIP mailbox displays in Mail on iOS all the time, whether or not you have any VIPs; this is not the case on Mountain Lion.)
Differences on iCloud and in iOS The iCloud website displays the VIPs mailbox much like OS X; each sender has their own VIP mailbox, and if you click on one, you’ll see all his or her messages. Things work differently on iOS: all your VIPs’ messages appear together in one VIP mailbox in Mail. Messages sort into reverse chronological order (the newest emails at the top). There are no sort options on iOS Mail, so you can't change this.
Getting Notifications in iOS On iOS, go to Settings > Notifications > Mail. You’ll see a VIP section; tap that. Choose here to have emails from your VIPs show up in Notification Center; you can also choose to have banners or alerts, or badges on the Mail app icon, or even have your iOS device play sounds when these messages arrive.
VIPs are treated separately from other contacts in Mail on iOS. Even if you already have alerts and sounds for regular mail, you can designate different alerts, and choose a special sound, for VIP emails.
Adding VIP notifications in OS X You can get notifications, however, using a Mail preference and OS X’s Notifications. First, go to System Preferences and click Notifications. Click on Mail in the list, make sure it’s listed as In Notification Center, and then choose Banners or Alerts. (For more on Notification Center options, see “Q&A: Mountain Lion’s notifications.”)
VIPs are a great way to make emails from your most important contacts stand out. Use them either permanently for your friends and family, or temporarily when you’re working on a project, and you’ll be able to spot your most important emails at a glance.
As long as you’re signed into your iCloud account, your VIPs will propagate across your devices, even to iCloud email on the Web. In addition, if your VIP has a card in Contacts and has more than one email address, the VIP status will be applied to all their addresses. However, there is no way to create or remove VIPs from within Contacts, either on OS X or on iOS.
 |
| It's easy to add a sender to your VIPs list in Mail. |
 |
| Tap the 'Add to VIP' button on your iOS device to add a sender to your VIP list. |
If this is your first VIP, a VIPs mailbox will appear in the Mail sidebar. Click the disclosure triangle next to that mailbox to see all your VIPs listed. Click on a name to see all the emails you’ve received from that person.
Adding VIPs on an iOS device If you want to add someone to your VIP list on your iOS device, tap the person’s name in the header of an email message to view his or her contact information. Then tap the Add to VIPbutton to add the person to the list. When you return to Mail, you’ll see all your VIPs’ messages in the VIP mailbox. (The VIP mailbox displays in Mail on iOS all the time, whether or not you have any VIPs; this is not the case on Mountain Lion.)
Adding VIPs on the iCloud site If you’re checking your email on the iCloud website, you can also add people to your VIPs list. Just click on an email address in an incoming message, and check the box next to VIP on the popup window that displays.
Removing VIPs If you ever want to remove people from your VIPs list, perform the above operations in the opposite direction.
 |
| You can also set a sender to be a VIP on the iCloud website. |
On your iPhone, for example, tap a person's name in the header of an email message to see his or her contact information, and then tap the Remove from VIP button. You may want to temporarily add people to your VIP list while you are working on specific projects, or for a short period of time when you need to see when their emails arrive.
Use the VIPs mailbox
Clicking on a name in Mail’s VIPs mailbox will show you all the emails you have received from that VIP. Unfortunately, you won’t see sent messages, so if you want to find those, you’ll have to search in your Sent mailbox.
 |
| On your Mac, VIPs will appear listed in their own VIP mailbox. |
Do you archive your mail in different folders? You can limit what you see in your VIPs mailbox to only those messages still in your inboxes. Select the mailbox—either the master VIP mailbox or a particular VIP mailbox labeled with a sender’s name—then choose View > Sort By > Inbox Only.
You can’t change the order of VIPs mailboxes in Mail; they display in alphabetical order by the first name of the person. However, you can change the name of a mailbox. Double-click it and put in the name you want. For example, you might want to have your VIPs show up in last name, first name order; you can make that change.Differences on iCloud and in iOS The iCloud website displays the VIPs mailbox much like OS X; each sender has their own VIP mailbox, and if you click on one, you’ll see all his or her messages. Things work differently on iOS: all your VIPs’ messages appear together in one VIP mailbox in Mail. Messages sort into reverse chronological order (the newest emails at the top). There are no sort options on iOS Mail, so you can't change this.
Get notified
One of the best things about VIPs is that you can easily be notified when you receive email messages from them.
 |
| Want Mail to play sounds when VIP messages arrive? It's easy when you set up this rule in OS X's Mail. |
Getting Notifications in iOS On iOS, go to Settings > Notifications > Mail. You’ll see a VIP section; tap that. Choose here to have emails from your VIPs show up in Notification Center; you can also choose to have banners or alerts, or badges on the Mail app icon, or even have your iOS device play sounds when these messages arrive.
VIPs are treated separately from other contacts in Mail on iOS. Even if you already have alerts and sounds for regular mail, you can designate different alerts, and choose a special sound, for VIP emails.
Adding a rule in OS X On OS X, it’s easy to set up a rule in Mail to perform certain actions when VIP emails arrive. Go to Mail > Preferences and click on Rules. Then click the Add Rule button.
For the first condition, chooseSender is VIP. In the 'Perform the following actions' section, you can choose to have certain actions occur. For example, I have my VIPs’ messages trigger the New Messages Sound, so I can tell when I get messages from them. (Note that Mail rules are duplicated on other Macs that use the same iCloud account, so if you set up a rule on your desktop Mac, the same rule will act on your laptop.)
 |
For the first condition, chooseSender is VIP. In the 'Perform the following actions' section, you can choose to have certain actions occur. For example, I have my VIPs’ messages trigger the New Messages Sound, so I can tell when I get messages from them. (Note that Mail rules are duplicated on other Macs that use the same iCloud account, so if you set up a rule on your desktop Mac, the same rule will act on your laptop.)
Adding VIP notifications in OS X You can get notifications, however, using a Mail preference and OS X’s Notifications. First, go to System Preferences and click Notifications. Click on Mail in the list, make sure it’s listed as In Notification Center, and then choose Banners or Alerts. (For more on Notification Center options, see “Q&A: Mountain Lion’s notifications.”)
Next, in Mail, go to Mail > Preferences and click General. Set New message notifications to VIPs. Now you’ll get the notifications you set up only for your VIPs. This can work in conjunction with any rule you have set up, as explained above.
Data souece: Macworld (Kirk McElhearn)
Post a Comment